WaveAudia Waterproof PWC Sound System Review
No cutting, no drilling...no problems
I’ve been around the watercraft industry for a long time, and over the years I’ve seen numerous attempts at audio systems on PWC. Some were complete permanent installations of marine stereos and speakers, requiring (what else) numerous holes to be cut and drilled into your craft. Others were completely portable units, which strapped into place on the craft. One was permanent, the other was bulky. Neither seemed to really catch on.
Now, just as the audio craze seems to have died down, a new player — WaveAudia — has come on the market.
The WaveAudia system differs in that all the components attach via adhesive strips. Yes, adhesive strips. Apparently adhesives have progressed to the point they can handle relatively decent loads. The 3M VHB adhesive in question uses thin foam to absorb shock, and, according to 3M, has the strength of a mechanical fastener. As a result, it’s not necessary to drill any mounting holes or cut out for any speaker grilles. Instead, the enclosed, waterproof speakers latch on to mounting cleats that literally “stick” to the console, the volume control is little more than a thick sticker that you can tuck below the glovebox lid (or numerous other locations), and the power button is a self-enclosed unit that can be threaded into the glovebox.
It’s relatively slick, but does it work? That’s what I intended to find out.
The Install
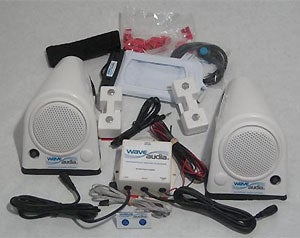
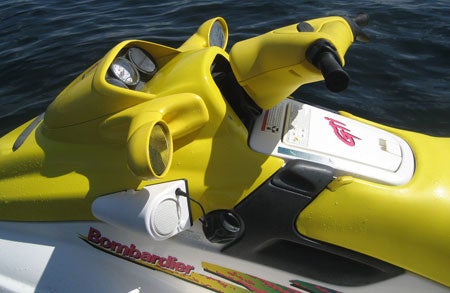
Though at first glance the idea of installing the system seemed daunting, in reality it proved a relatively simple task. The first step is to choose the location for the speakers. This will vary depending on your PWC, but along the console in the vicinity of the mirrors works best. Don’t worry if the console has a slight curve to it; the adhesive strips are mounted toward the center of the speaker base. That allows an outer rubber gasket to handle most gentle curves and still look nicely finished.
I won’t repeat the directions here, but I’ll offer some installation tips. For starters, use the entire speaker unit as a template first, masking off your install area with masking tape, or tracing lightly with a wax pencil. Choose a location and angle that looks good on your boat, but also if possible one that directs the sound up toward your head. Once you’ve chosen the spot, remove the heavier speaker from the lighter weight mounting cleat (base) and stick it on, leaving for a full 24 hours to allow the adhesive to reach full strength before reattaching the speaker.
Next comes the volume control switch. Though you can mount it on the handlebar, that requires disassembly of the handlebar pad. An easier location is adjacent to the glovebox, where you can almost immediately tuck the flat wire out of sight. The power switch can be left loose, or also mounted with adhesive. Again, inside the glovebox seems to be the best location.
That leaves the amplifier. Inside the front storage compartment, or behind the compartment against the hull itself seems to be the most logical spot. The input wire can then be routed up to the glovebox door.
Remember, a PWC hull takes a beating as it bounces over the waves. Make sure all mounting areas are clean and dry to get best results out of the adhesive.
Power On
The directions are pretty clear when it comes to wiring and connecting components. The volume control switch attaches via a 3-pin connector; speakers plug in with audio jacks; and the input is routed to a waterproof bag that holds an MP3 player. The bag includes a loop to thread a Velcro strap, which can be fastened around the glovebox lid.
Real wiring is minimal. The amplifier is connected to the power control switch, and positive and negative leads are then routed to the battery for connection with ring terminals. Make sure as you use the connectors that you don’t confuse the two Quick Connectors with the single in-line connector. The in-line connector allows the negative from the power switch to splice into the longer lead that runs from amplifier to battery. Wires can be cut to length to match the requirements of your craft. Support wiring with the provided zip-ties and adhesive-backed mounts.
Once you make the final connection, check for power by turning on the push-button switch. A blue light illuminates to show it’s on or off.
I have one gripe about the electrical connections. Personally, I’d rather see waterproof, heat-shrink connectors given the potential water exposure in the engine compartment. At minimum it would fend off corrosion down the road. Personally, I’d upgrade; connectors can be found at any marine supply, like West Marine.
Sound Check
As previously mentioned, the sound source is an MP3 player (not included). My iPod Touch fit into the waterproof bag perfectly, and I could still use the touch-screen controls through the clear plastic window on the bag’s front. The unit powered on as promised, and almost instantly I was hearing my favorite tunes.
How’s the sound? Probably what you’d expect from a portable speaker of this size and in this environment. It’s not equivalent to your car’s high-end audio system, but sound was clear and decent. One thing I liked was that volume could not be cranked up to deafening levels. On the water, I think it’s important to maintain the ability to hear other boats around you, not to mention not annoy the neighbors. I also like that speakers can be tilted slightly within the surrounding base, to direct sound a little more toward its target.

Of course, the ultimate question is how the system will hold up over time…and exposure. In my saltwater environment, I’d definitely rinse things with fresh water at day’s end to ward off corrosion. As mentioned, I’d also upgrade to heat-shrink, waterproof electrical connectors.
As to how well the speakers hold, they’ve held fast in the short time that has passed since the install. How they’ll be a year from now I’m not so sure, but I’ve read up on the adhesive in question, and it would appear to be amazingly durable. That makes the WaveAudia system pretty unique in that it mimics a permanent system, but doesn’t require any drilling or cutting.x
In my book, that’s a good thing.
The complete WaveAudia sound system retails for $441. For more information, check out WaveAudia.com.
Get PersonalWatercraft.com in your Inbox!
Like PersonalWatercraft.com on Facebook
Comments
Most Popular

2025 Yamaha JetBlaster PRO 2-Up Review

2024 Kawasaki Jet Ski STX 160X Review

Remembering the Sea-Doo XP
Whatever Happened to the Wetbike?

2025 Yamaha JetBlaster Review











 Your Privacy Choices